Before you create a layout of the site you will have to think about the structure of the site, make a prototype and choose a color scheme. About all this in order.
Stage 1: the structure of the layout of the site
Get the perfect website layout in 27 steps

Be sure to plan in advance the architecture of the site – what and where will lead and how will be interconnected elements. You can do it in your head, on paper or use MindMap to build the structure. Build MindMap when designing a site will help you decide on the number of pages to draw. You will have a detailed idea of the project as a whole.
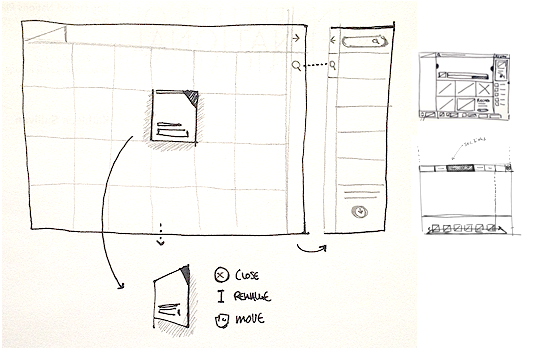
Step 2: Creating a website prototype
Then you can immediately begin to draw a layout of the site in Photoshop, but, even if you do the layout of idle curiosity, first you should draw a prototype site. In step-by-step development, prototyping – an essential stage that strengthens the mental health of the web designer. When you create a prototype of the key blocks of the future site (cap, slider, buttons, contacts, the structure of the material, etc.), we recommend using free mockup. This allows you to significantly save time at the stage of drawing the layout as you can see the approximate result and painlessly make changes.
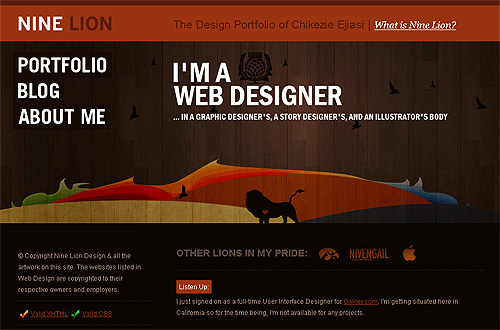
Step 3: Make a beautiful layout of the site: choose a color

What You Should Know About the Game of Colors When Creating Your Brand

A successful choice of colors depends on the perception of the site and brand users. I do not advise you to rely on your own strength – it may take hours to find the right shade. Therefore, I recommend using ready-made color palettes for the web.
Introducing the site? Did you make a prototype? Did you choose the colors? Now you can move on to creating the layout itself.
Step 4: Slicing the layout from the template of the site
This way will suit you if you want:
- to understand the basic tools of Photoshop;
- find different references for your future site and put them together.
How to do that.
The easiest and fastest way to make a website layout is to choose a template for a certain CMS and redo it for yourself. So first you need to decide on the CMS, which will greatly simplify the development of the site. However, please note that the site design will be limited to those elements that are in the template. Of course, you can change colors, but individual interface elements are ready and you can not change them.
What next? Choose the size of the site layout, cutting and glue.
Once you’ve mastered the template, you can start cutting it. Great, if the resolution of your screen is 1920 px or more – it will simply allow you to take screenshots of parts of the site and connect them in the editor. Work with the layout begins with a hat (header), then – different blocks (body), at the end – the basement (footer).
Step 1: Choose the width of the site layout.
Fixed vs. Fluid vs. Elastic Layout: What’s The Right One For You?

Decide which page you’ll do first. Do not start with the main – it is better to leave it for last because it is the most important page of the site and first it is better to fill a little hand.
Open Photoshop and set the width of the site layout 1920 px. This will be enough to see how the site will look in your browser. If you have less resolution, set the width that the monitor allows. About the height, until you worry – it is difficult to guess and still have to stretch/narrow the area.
Step 2: Continuing to create a layout of the site in Photoshop

Pick a hat in the template that you like. Cut it out with a handy tool, open the document in Photoshop and paste it there (Ctrl+V). Use the Move Tool (V) to place the cap on top. I like the top bar where you have contact information about the company.
Step 3. Let’s go to success.
Fill your layout with different blocks and edit them according to your needs. At this stage, you can not play with flowers if you do not have the skills to use Photoshop. In order to increase the height of the layout, use the “Frame” tool (C).