BitLocker is a disk encryption feature that was introduced quite a while ago, with Windows Vista. It was originally part of Microsoft’s “Cornerstone” project to prevent unauthorized access of information on a PC, especially in the event of loss or theft of the machine or drive. BitLocker is currently available on limited versions of Windows. On Windows 10, you’ll find it on the Pro, Enterprise and Education editions.
Top 6 Windows 10 Annoyances (and How to Fix Them)
Although the earliest Vista interface of BitLocker allowed only OS volume encryption, the current version includes the ability to encrypt other volumes and drives, including removable drives. In addition, alongside Windows 8 Microsoft introduced a spec called Microsoft Encrypted Hard Drive, which offloads BitLocker’s encryption operations to the storage device’s hardware. BitLocker can now also be managed using PowerShell. One of the best parts of Bitlocker encryption is that the computer password won’t be unlocked or reset by password recovery program like Ophcrack or PassMoz. Without it, people could unlock the computer in a few moments.
Here’s how to encrypt a Windows disk using BitLocker
First, you’ll need a compatible TPM, or Trusted Platform Module, which is essentially a hardware component that validates system boot file integrity prior to decryption. Most modern computers come with this module installed in the motherboard. Essentially, the TPM holds the recovery key in version 1.2 and higher.
The process of enabling BitLocker is quite simple. Just follow these steps:
Step 0: Before you begin, make sure you have admin access on the machine where you want to encrypt the disk. You also need a printer to print the recovery key.
Step 1: Assuming your computer meets the basic TPM and Windows version requirements, go to Start >> Control Panel >> System and Security. You’ll see an option called BitLocker Drive Encryption.
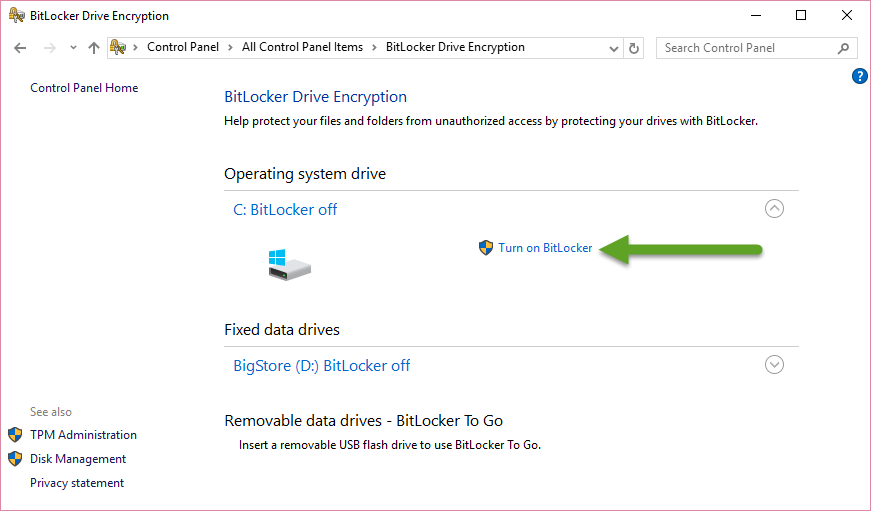
Step 2: Click on that option and then click on Turn on BitLocker against the disk or drive that you want to encrypt
Step 3: BitLocker will now scan the computer to make sure all the requirements are met. If they’re not, the setup program will tell you what it’s going to do, such as turning on the TPM hardware.
Step 4: At this point, you may be prompted to remove any flash drives, DVDs or CDs from the computer. You may also see a prompt asking you to shut down your PC and restart it, then follow the instructions to turn on TPM when it boots up again.
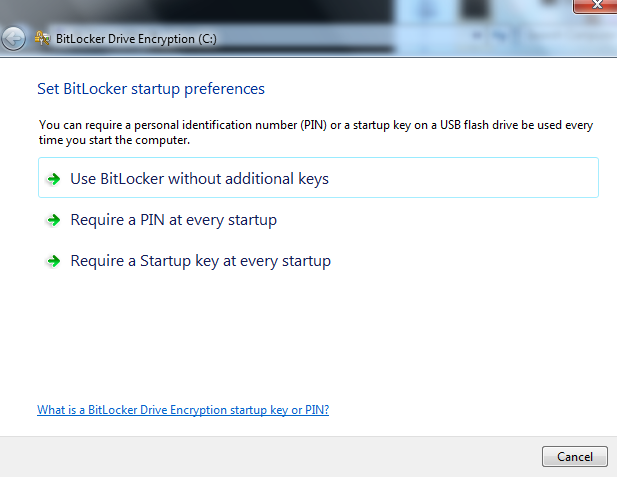
Step 5: Once that process is complete, the BitLocker setup wizard automatically resumes where it left off. Now, you’ll see two options: “Require a PIN at every startup” and “Require a startup key at every startup.” For the second option, you’ll need a USB flash drive to save your key.
Step 6: Clicking on the PIN option takes you to a window where you need to set up a PIN between 8 and 20 characters long. Enter that twice and then click on Set PIN.
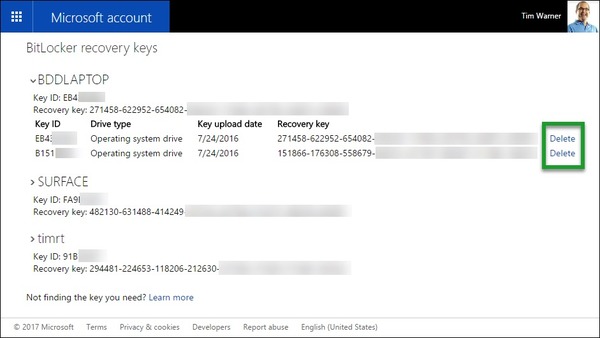
Step 7: Now, you’ll need to setup your recovery key, which you can either save to a file or print out. Choose the appropriate option and click on Next.
Step 8: Once you’ve done this, you will see a prompt asking you to restart the computer so the encryption process can be completed.
BitLocker Drives Unlocker [AddictiveTips Apps]
What BitLocker does is to change the way you access your PC. After enabling it, you’ll need to enter the PIN or use the startup key each time you log in. It’s an additional layer of security, and you can apply it to any volume, including external storage devices connected to the PC. If you have a lot of sensitive or confidential information that you don’t want anyone spying on, then BitLocker makes that task very easy.
Using a similar method to the one described above, you can also manage or decrypt the drives, disks and volumes you’ve encrypted. If you want to make another copy of your recovery key or change your PIN, once again go to go to Start >> Control Panel >> System and Security >> BitLocker Drive Encryption. This time, click on Manage BitLocker. You’ll also see an option to Turn Off BitLocker. For both these options, you’ll be shown stepwise instructions on what to do.
The PIN and Startup Key are the only things that prevent others from accessing your encrypted disk, so make sure that they’re kept in a safe place and no unauthorized person can get a hold of them. In addition, we recommend that you use a password manager like LastPass or Dashlane to save your login passwords. It provides additional security when you’re online, and you only have to remember one master password for the password manager itself.